My fitness journey – 01 Jan 18 to 30 June 18 – Six Months of Tracking

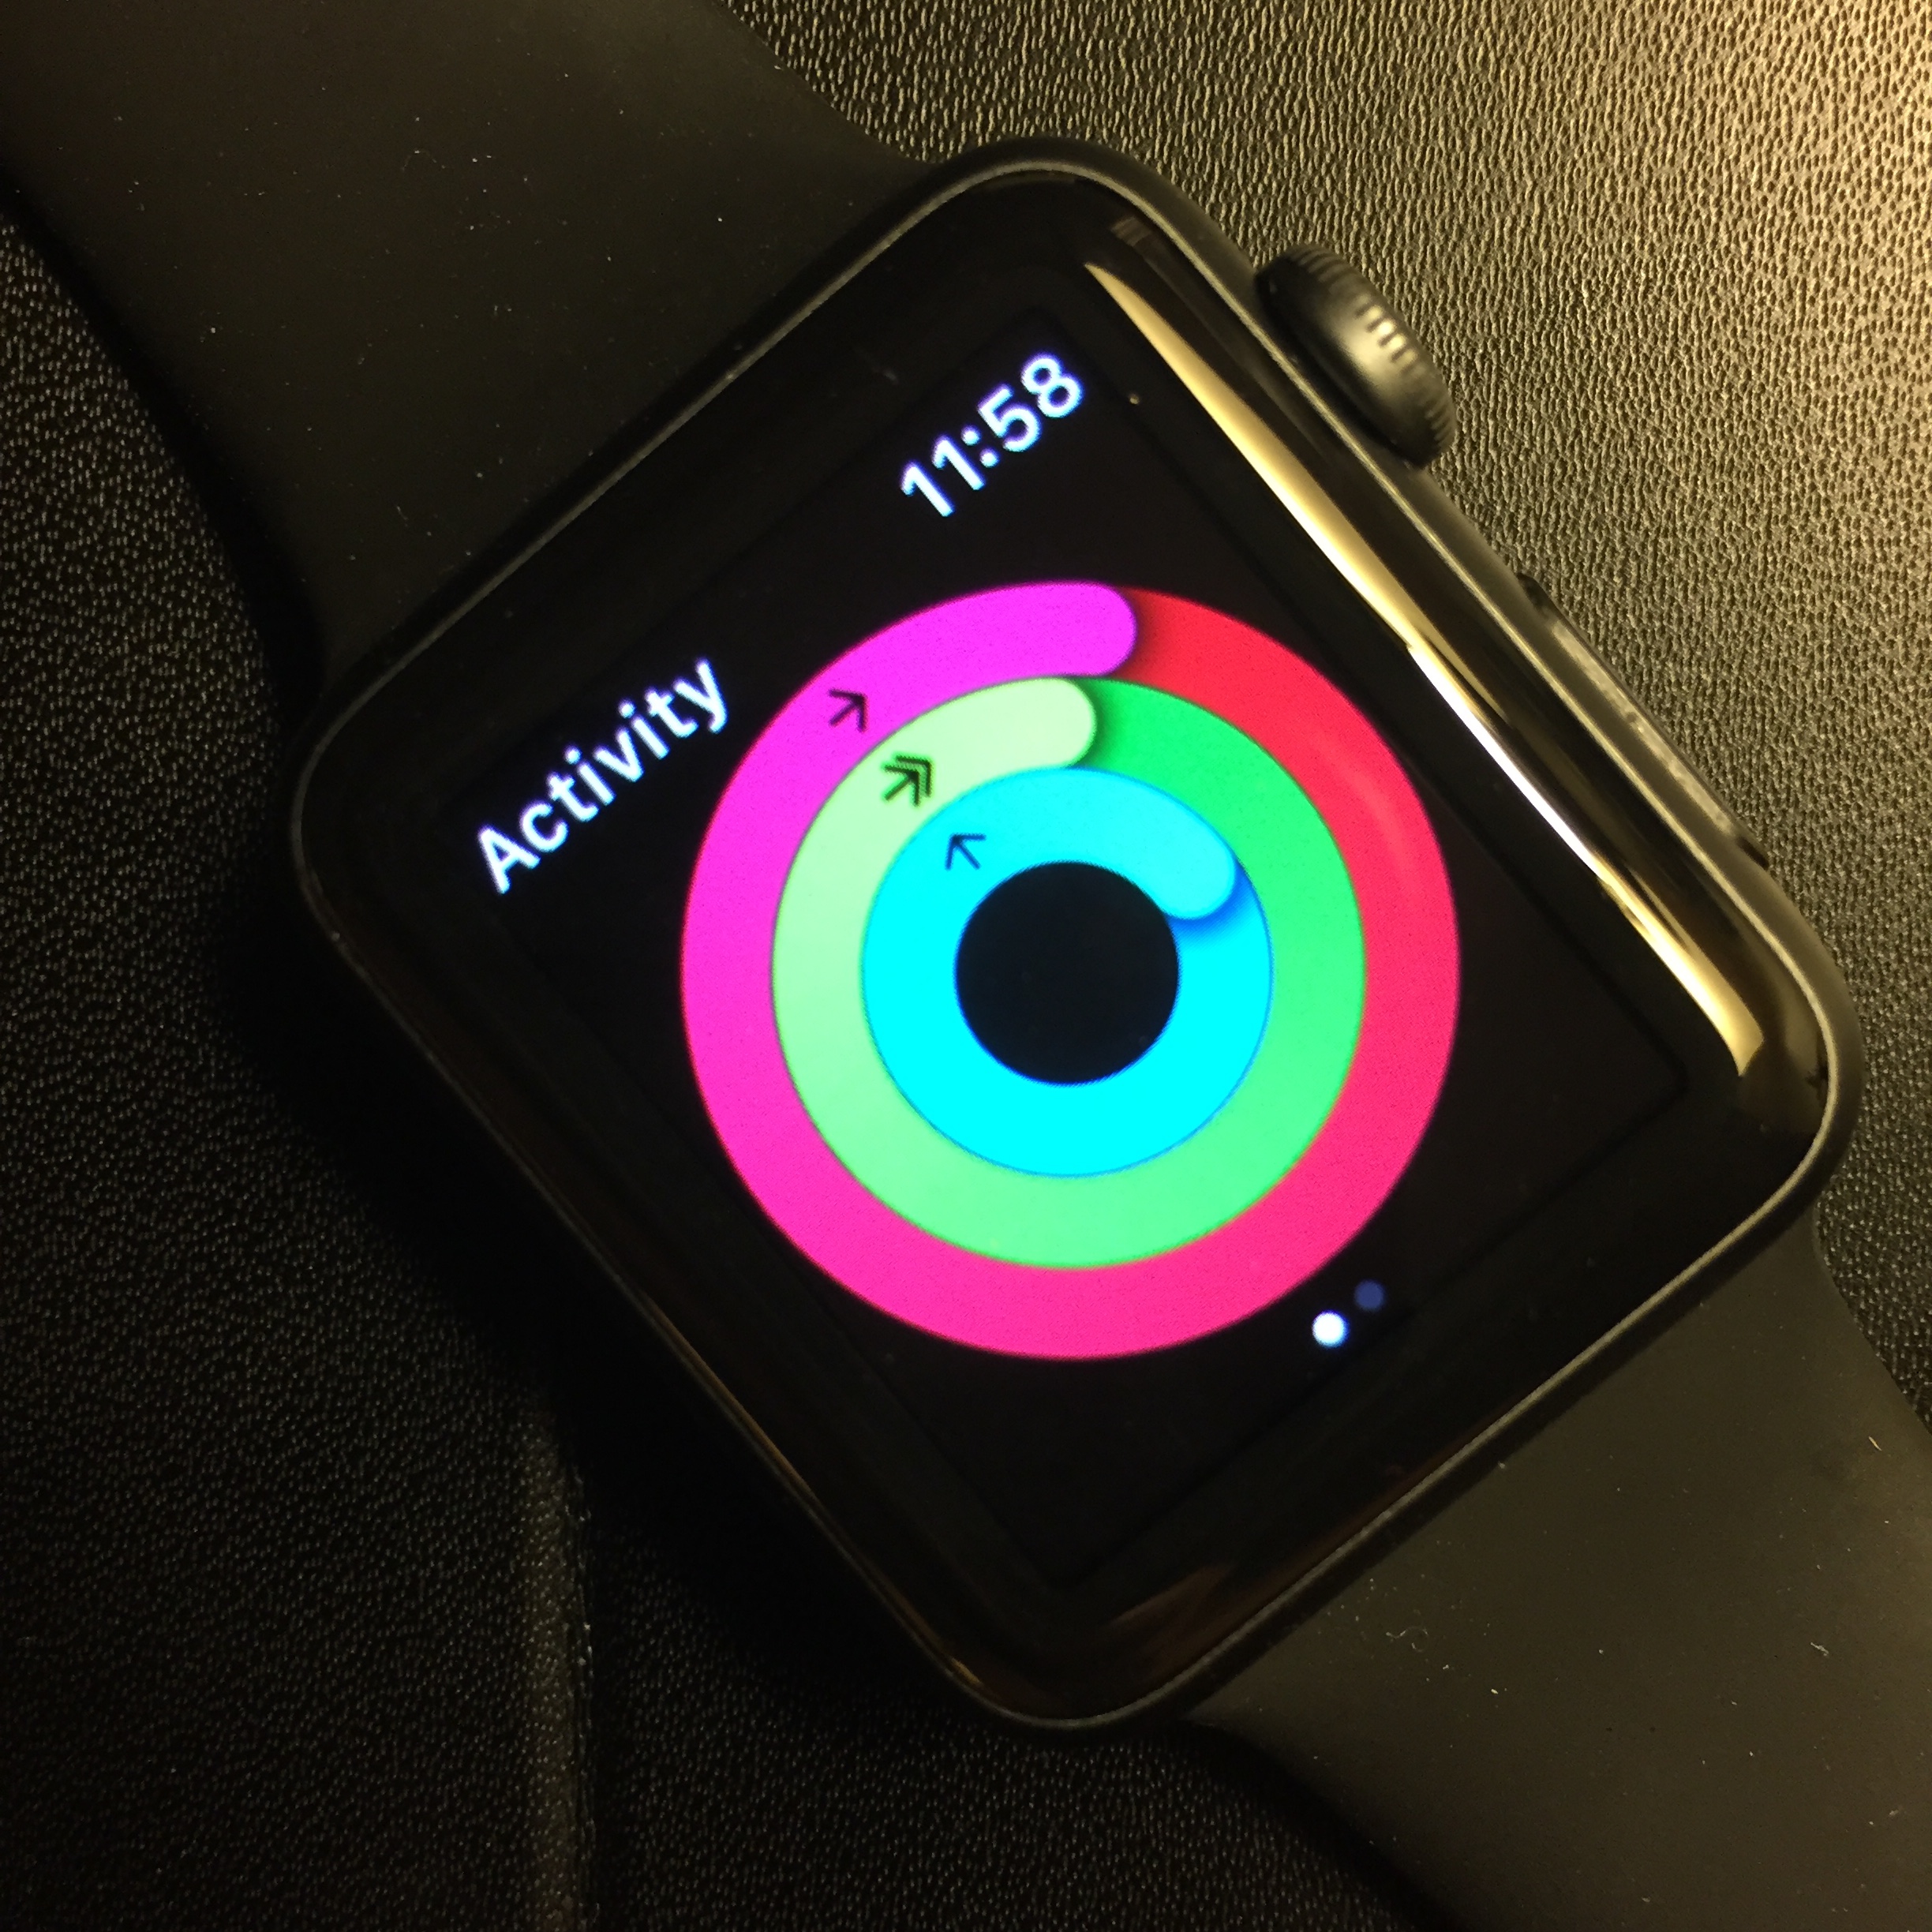
On July 3, 2017, I purchased my Series 1 Apple Watch from Best Buy – specifically for fitness tracking. NIce to say that one year later, it has served it’s purpose.

While I’ve worked out more on than off since my college days, the watch, through the Activity app and iOS Health app dashboard, provides a fair amount of data that can be sliced and diced in various. What I think the Apple Watch fitness ecosystem lacks is website and/or desktop integration like FitBit, Garmin and what Nike Plus used to have.

Prior to the watch, I used the Nike Fuel ecosystem to tracking my running first and then, with the addition of the Nike Training app, I tracked other forms of exercises that aligned with their app’s workouts. I specifically started using the Nike Fuel Band late in the game (August 2017) For the beginning of my journey with the NikeFuel ecosystem through now, you can read the blog posts here, here, and here

That said, looking at what the watch’s Activity app and iPone’s Health app portray as data, I decided to take a look at how and what I did for the first six months of 2018, I didn’t include the entire year I owned the watch, because it took some months to really understand how to use it as a fitness tracking device, something I know I have maximized yet.I took some very basic data points, threw them in Excel and created some simple data visualization graphics (aka charts LOL) to give me an idea of how things look since 1 Jan. The Health app provides a fair amount of ways for you to see data on what you’ve done over a specified time range, however I wanted to look at things in which the app can’t (as far as I know.) You can see them in the attached graphics.

It was pretty cool to see the data this way, because it now lets me know what changes I may want to make for the second half of the year. Feel free to let me know what you think. I’ll get around to doing a more detailed blog post with my plan forward based on what I’ve learned from the data. For now, here are a few of the ways I looked at what I accomplished. For all the following data, I created a small spreadsheet and manually entered all the data I wanted from the Activity app summaries, then created graphs

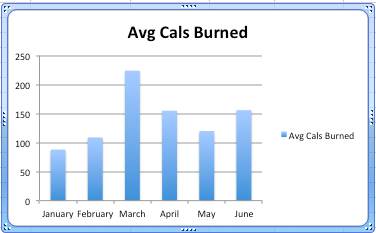
While losing weight is not a concern of mine (at the moment haha), I decided to see what kind of average calorie burns my exercise workouts netted me, and would they vary widely at all from month to month. The data in this graph clearly correlates to the following data points you’ll see below.

What were the average hours per month that I worked out? As said above, this aligns with my average calorie burns (obviously). Another reason why I want to track this statistic was to draw some correlation to how busy I may been from month to month or any other factors I can remember that would cause me not to exercise (lack of discipline and/or motivation, not enough sleep, poorly planned schedules, etc).

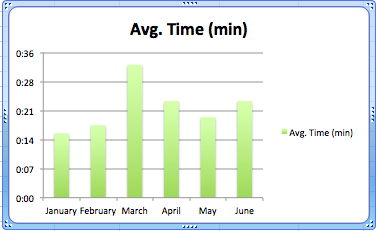
Another data set that correlates to the above is average exercise minutes per month. The Apple Watch has a standard, unchangeable metric of 30 minutes, of movement greater than that of an average brisk walk, needed to close the exercise ring – whether that is done doing and saving an actual workout from its list or just achieving that closure through daily movement. The 30 minutes minimum of daily exercise originates from the American Heart Associations recommendation, which Apple adopted for its baseline for the Activity app. From a ring closure standpoint, I found myself at least trying to do 30 minutes daily, HOWEVER, I also found that I did it only as my maximum when I could have done more. This, to me, is not a good thing because it places the focus on on only doing enough to achieve a metric goal and not doing a full set of exercises that would normally take more than 30 minutes. What I learned from this is just that – focus on what your exercise regimen is and make time for that average timeframe instead of doing just enough to close a ring – that is shortchanging at at best.

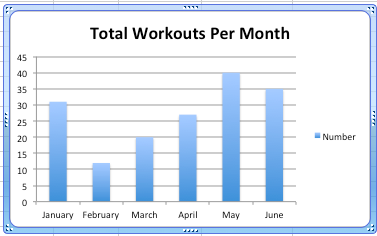
Here I decided to look at the total workouts done per month, regardless of what type of workout it was. It gave me an idea of just how many workouts I set out to do, which is (again) directly proportional to the time put in.

This last data set is my favorite because it shows, in a given month, how many different types of exercise workouts I did. My fitness regimen is primarily comprised of weight/strength training exercises. Over the last year, my desire was to work in exercises that would benefit me in the areas of cardio and core. I took up running in 2010, at the same time I became interested in tracking my fitness via the Nike+ iPod Sport Kit. I never cared for running and after a few years of hiatus, I finally started working it in more last year, and became a better runner than in the beginning. As for core, enter the Nike Training Club app. I LOVE this app and it’s been my go to for all the core workouts I do. It doesn’t one-for-one save it’s exercises (as it should) with the same name as the corresponding exercise in the list of Apple Watch workouts, but it gets the job done well enough. That said, it was interesting to see what exercises, in hindsight, were focused on for various reasons (known and unknown). I drew insight from this to help me plan the second half of 2018 with exercise types that will better provide the focus for what I want to achieve health/physical-wise.

The last reason I want to do this experiment was for finding out how I can slice and dice the data to show me what I want. I’m certain that there are tons of apps that can show similar (the Health app itself can show similar looking bar graphs), but it was a fun exercise to do on my own.

Well, thats about it. I was able to gain some good insight to plan for the rest of the year.

Thanks for the read.

Fresh!

Life happens while your making plans (fitness/exercise/training/goals)

What’s up everyone. Hope all is well. It’s Wednesday evening about 7:02pm and I’m just wrapping up work for today. Had to jet out for 90 mins to pick up my car from the auto body shop and get the rental returned, hence the late hours here. I was just thinkinig how well my runs and workouts (bodybuilding/strength building) have been consistently going. I ran my fastest mile last Friday and detailed my strength training workout program…but that’s just it. It was my last day in the gym.

This is a common thing that happens to many of us, no matter what we’re involved in. One day off can turn into two, two into…well, you get the picture. Add to that other projects and interests and you can see how conflicts can make themselves apparent. While it’s easy to let discouragement set in (as it has in the past), I’m looking for ways to maintain the motivation….and will find them. Maybe I’ll post the list when I compile it (for all those interested, raise your right hand 🙂 )

Interestingly enough, I was looking for a graphic for the intro to this post (the one above) and ironically, a great article was attached to it 10 Excuses for Not Exercising, and Why They Won’t Fly. While all don’t personally apply to me, the first one I can be guilty of. If you’re trying to stay on your program, I hope this article is useful. If you’re about to start, hope it is equally as useful.

Ok, I’m gone. Take care.

::: oceans of rhythm :::

Fresh!

1st Run – Nike+ iPod (Nike Plus)

Greetings readers…

I hope this post finds you well. Some of you that have known me for years also know that I regularly try to exercise and have been working out more on than off since college. For those that regularly exercise, often times it can take just *one* break to get you to fall off the fitness wagon for a good long time. I suffered such a break and have been off the wagon for about TWO YEARS (thank goodness for muscle memory and a decent knowledge of a good diet), luckily during that two years, people still have occasionally asked me if I work out, so that’s a good thing.

In the same vein, some of you know I’m a techie and a mild gadget guy. Being such, one of the gadgets I own and enjoy is a 2nd generation iPod Touch. Late last year when I graduated up from a failing 1st generation one, I noticed it came loaded with the Nike Plus app. I knew of the Nike Plus system primarily as an app to track runs. There are many other free and paid fitness apps at the iTunes store, a few that I tried, but I paid no attention to the Nike Plus app.

Unsatisfied with being off the wagon for so long, I recently took another look at the Nike Plus app and then went to the website to see how this thing really works. I first found out that the sensor in the sports kit transmits data from your work to your iPod at 2.4 GHz…that immediately interested the techie in me (wireless transmission anything gets me, and as an engineer, I’ve worked for years in fields that use it). Now that I became more interested in it, the biggest thing I wasn’t interested in was……running. I never really cared for it and REALLY had my share of it while pledging a fraternity (Alpha Phi Alpha) in undergrad. During those 12 weeks I had to run just about everywhere I went…in combat boots…class to class, class to the dining hall, dining hall to my dorm, my dorm to class…you get the picture.

Consequently, from a fitness popularity standpoint, all I saw around me regularly, were runners. Since I let my World Gym monthly membership go, I wanted to adopt another form of exercise that would get me in shape and keep me that way. After some thought, running seemed to be the best. I went back to Nike’s site, and became wowed not only by their marketing of Nike Plus (this IS Nike, right?) but the resources that it offers to new and season runners alike. Still loving this whole tech + fitness combination, I became even MORE interested.

Nike (unsurprisingly) makes special shoes that house the sensor which sends the data to your iPod Nano or 2nd Generation iPod Touch. The most popular shoes in the Nike Plus line are in excess of $80….I have NEVER paid $80 for a pair of sneakers in my life and wasn’t about to. Even the New Balance and Nike crosstrainers I’ve had over the years didn’t exceed that price. So…of course, I hop on the net to find out other ways of using this sensor on non-Nike Plus shoes. Unsurprisingly, I found hacks, mods, and actual products that allow you to use the sensor with other shoes…hence saving you money if already have running shoes OR don’t prefer Nike shoes for whatever reason (I’ll provide some links below). Along with some Google search results, I decided to hop to my fave place for info, Twitter, to get some feedback on those in my stream that run and post their results to various places on the web. I got feedback by those who use the Nike Plus shoes and those who don’t…a perfect sample size to help me decided which way I want to go. Primarily, I didn’t want to spend that amount of money on a pair of running shoes, but as I gave it more thought, I realized that I’ll be running and should get a pair of shoes designed for that, as opposed to any sneaker. Still seeing some ASICS, NB, Sauconys, Nike and others in excess of $125, I was like…whew. After my three hours of article reading, Twitter feedback, and Nike Plus related videos on YouTube, I decided that as an engineer, I thrive on accuracy. I found that mounting the sensor in the sole of the shoe (as opposed to in the tongue/laces area), would provide the most accurate data results….I couldn’t let go of the need for accuracy LOL (it’s ingrained in my from professional training and being a techie, what can I say?) It was this post that made me decide to get a pair of Nike Plus running shoes (instead of cutting a hole in the current (but old) NB crosstrainers I own (wifey was shocked to see me with a new pair of sneakers on top of that …LOL). That being said, I chose, at $63, the Nike Air Alaris+ (I feel I got the best of both worlds…the tech, and a good shoe at a decent price – think I’ll hit Sports Authority for a second pair):

Fast forward to day one of the run (today). After reading up on how to set up the sensor with iPod Touch, I was psyched to do my first run this morning. The only issue I had was though the sensor was linked to the iPod, when I was prompted to calibrate it by walking around, the iPod Touch couldn’t find the sensor. After a few times last night, I gave up and decided to try in the morning.

I arise at 5:30am, get dressed, grab some juice and a cup of apple sauce and head out. I open the garage door and………….rain….ugh! After watching it for a bit and seeing it let up, I decided to take a first time drive to the nearby community college that has the track that I’ll run on. I stay in the garage and try to calibrate the sensor, but still no luck. The rain let up on my side of town, so I drove out the track and tried once more to calibrate the sensor with the iPod…no luck! Still being excited about the run, the tech, the whole thing. I warm up by walking a few laps. At 7am, in light rain, there were already one runner and another walker. Within 30 mins, another runner and 3 more walkers arrive. After finishing lap 4, I was a bit disappointed that the iPod Touch still couldn’t find the sensor. I knew that it wasn’t necessary to calibrate it but I’m a fiend for accuracy. Being that this was the first time I ever ran for fitness, I stretched, and did one (yes one) lap only. Halfway through the lap, it started raining heavier, but the temperature didn’t make the rain feel that bad. I finish the lap and head home. Soaking wet and still no data to post online, I get home, dry off and hop in the shower.

After the shower and breakfast with my son (who was a lil ticked I didn’t take him with me at 6:30am), I decided to engage in my usual problem solving activity – hit Google search to see if anyone else has had this problem. Sure enough I found good amount of folk that experienced the same. It turns out that the sensor can be put to sleep by holding a small button on the bottom of it for three seconds. Though the sensor, as I understand, is supposed to come in the package awake (ready to use), I suspect mine was sent asleep. I read the guide again (finding nothing about having to wake it upon first use), as well as a few posts online, then flipped the sensor over, pressed the button, placed it back in the shoe, followed the instructions from the iPod Touch, walked around a bit and ….voila…received a sensor found message on the iPod Touch 🙂 Now, I’m definitely happy. I run back up stairs thinking I can do a run around the neighborhood, open the garage and…..rain!. Oh well.

As you can guess, I’m looking forward to my next opportunity for a run AND to be able to post my results on line. I’m excited about joining the Nike Plus running community.

Special shout outs to my Twitterati for the input and advice:

@daniellericks
@bevjack
@fave and Mrs Fave
and my new online running coach (haha..THX!) @FITTorrent

I’m exciting, and hope to keep it alive. Here’s a few links for anyone interested.

Nike Running (Nike+)
Nike + iPod FAQ (Technical)
How To Get Into Running? Your Complete Guide To Running Into Your Best Form
Hacking Nike Plus, Part 1Creating Your Own Nike Plus Sensor holder in any running shoe sole
Nike Plus Sensor Mod (YouTube)
Tweet Your Run Data
Nike Plus on Twitter

Thanks for the long read! Catch up with u later!

peace,
F!